Adobe Illustrator Tutorial: Create a Printer Illustration
Final Image
As always, this is the final image that we’ll be creating:
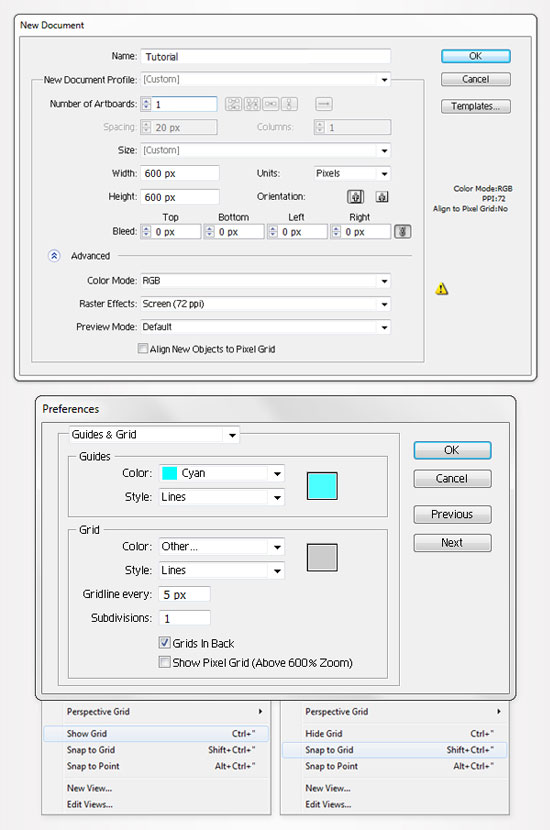
Step 1
Hit Control + N to create a new document. Enter 600 in the width and height box then click on the Advanced button. Select RGB, Screen (72ppi) and make sure that the "Align New Objects to Pixel Grid" box is unchecked before you click OK. Now, turn on the Grid (View > Grid) and the Snap to Grid (View > Snap to Grid). Next, you’ll need a grid every 5px.Go to Edit > Preferences > Guides & Grid, enter 5 in the Gridline every box and 1 in the Subdivisions box. You can also open the Info panel (Window > Info) for a live preview with the size and position of your shapes. Do not forget to set the unit of measurement to pixels from Edit > Preferences > Unit > General. All these options will significantly increase your work speed.
Step 2
Pick the Rectangle Tool(M) and create a 350 by 160px shape. Fill it with a random color, make sure that it has no color set for the stroke and go to Object > Path > Add Anchor Points. Keep this new shape selected and switch to the Direction Selection Tool(A). Select the middle, left and middle, right anchor points (highlighted in the second image) and simply drag them 25px up. The Snap to Grid will ease your work.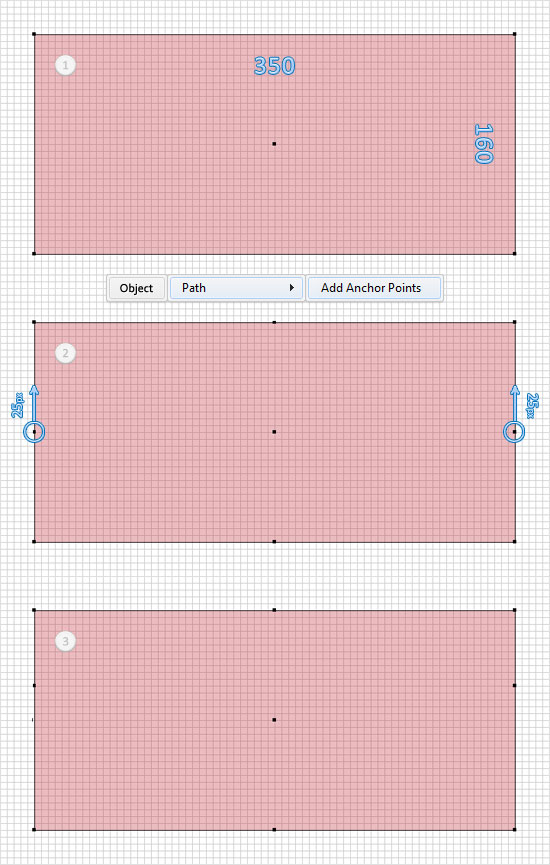
Step 3
Keep focusing on the shape created in the previous step and continue with the Direct Selection Tool(A). Select the top, left anchor point and move it 20px to the right then select the top, right anchor point and move it 20px to the left. Move down, select the bottom, left anchor point and move it 5px to the right then select the bottom, right anchor point and move it 5px to the left. In the end your shape should look like in the second image. Make sure that it’s still selected and go to Effect > Stylize > Rounded Corners. Enter a 5px radius, click OK and go to Object > Expand Appearance.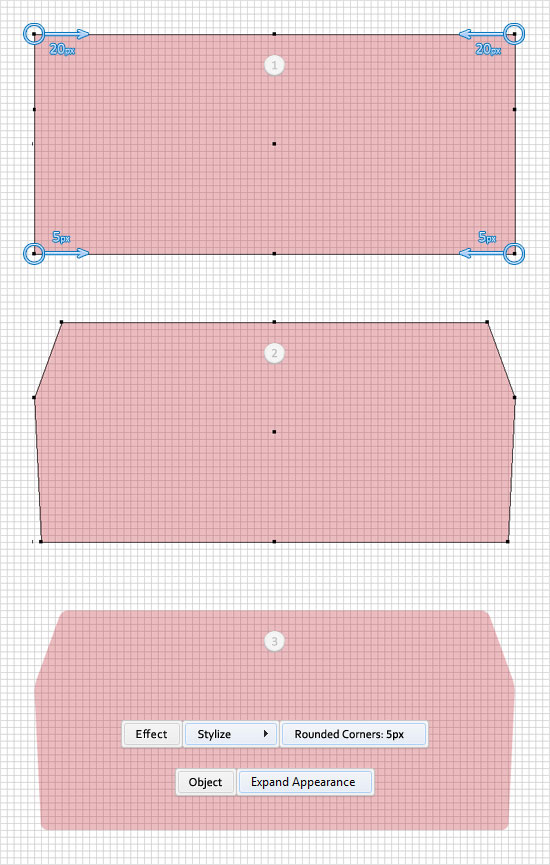
Step 4
Pick the Rectangle Tool(M), create a 360 by 5px shape and place it as shown in the first image. Select it along with the shape created in the previous step and duplicate them (Control + C > Control + F). Select these copies, open the Pathfinder panel (Window > Pathfinder) and click on the Intersect button. Fill the resulting shape with the linear gradient shown in the final image. The white numbers from the gradient image stand for location percentage.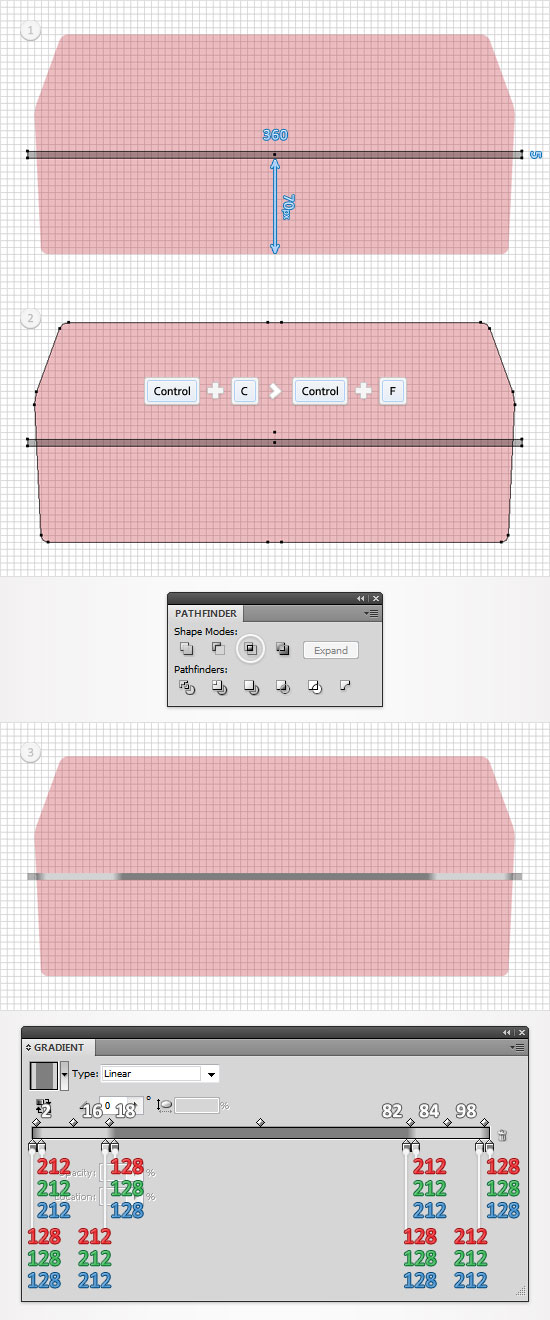
Step 5
Reselect the original thin rectangle created in the previous step along with the large shape created in the starting steps and click on the Minus Front button from the Pathfinder panel. Move to the Layers panel (Window > Layers) and you will find a new group with two separate shapes. Select it and ungroup it (Shift + Control + G). Focus on the bottom shape, select it and fill it with the linear gradient shown in the final image.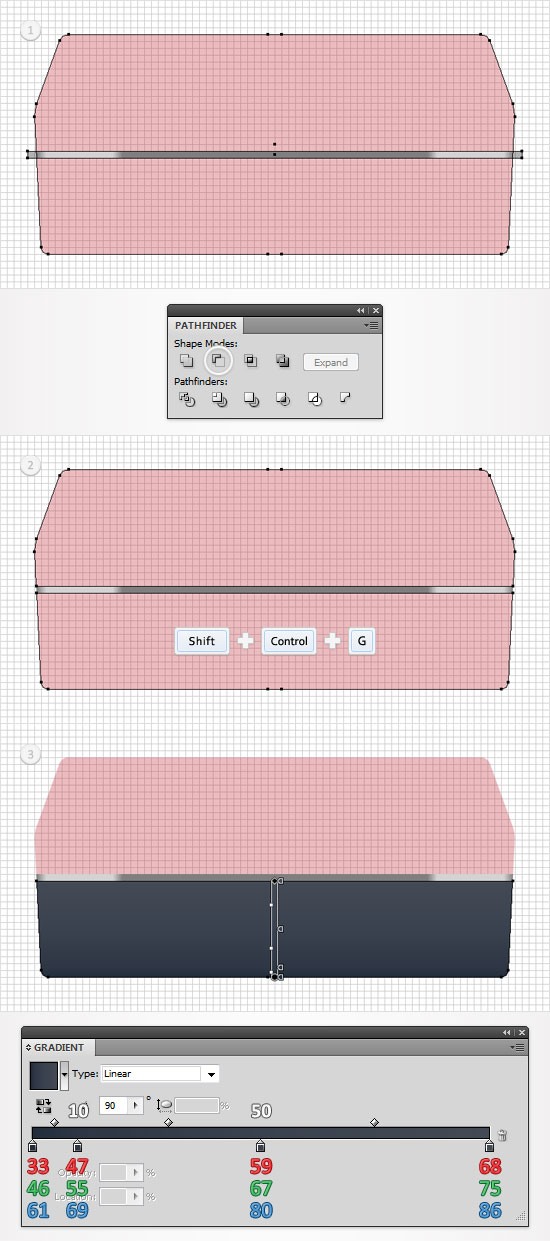
Step 6
Disable the Snap to Grid (View > Snap to Grid) then go to Edit > Preferences > General and make sure that the Keyboard Increment is set at 1px. Reselect the shape edited in the finale of the previous step and make two copies in front (Control + C > Control + F > Control + F). Select the top copy and hit the down arrow once (to move it 1px down). Reselect both copies and click on the Minus Front button from the Pathfinder panel. Fill the resulting shape with black.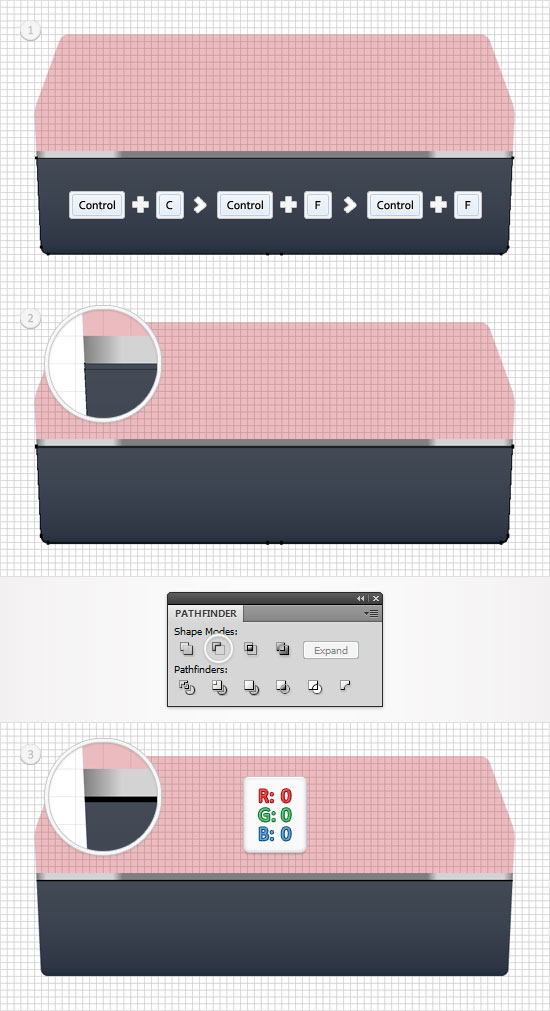
Step 7
Reselect the shape edited in the finale of the fifth step and go to Object > Path > Offset Path. Enter a -2px Offset and click OK. Duplicate the resulting shape (Control + C > Control + F). Select this copy and move it 2px down. Reselect both shapes created in this step and click on the Minus Front button from the Pathfinder panel. Fill the resulting shape with R=166 G=169 B=174, lower its opacity to 50% and go to Effect > Blur > Gaussian Blur. Enter a 2px radius and click OK.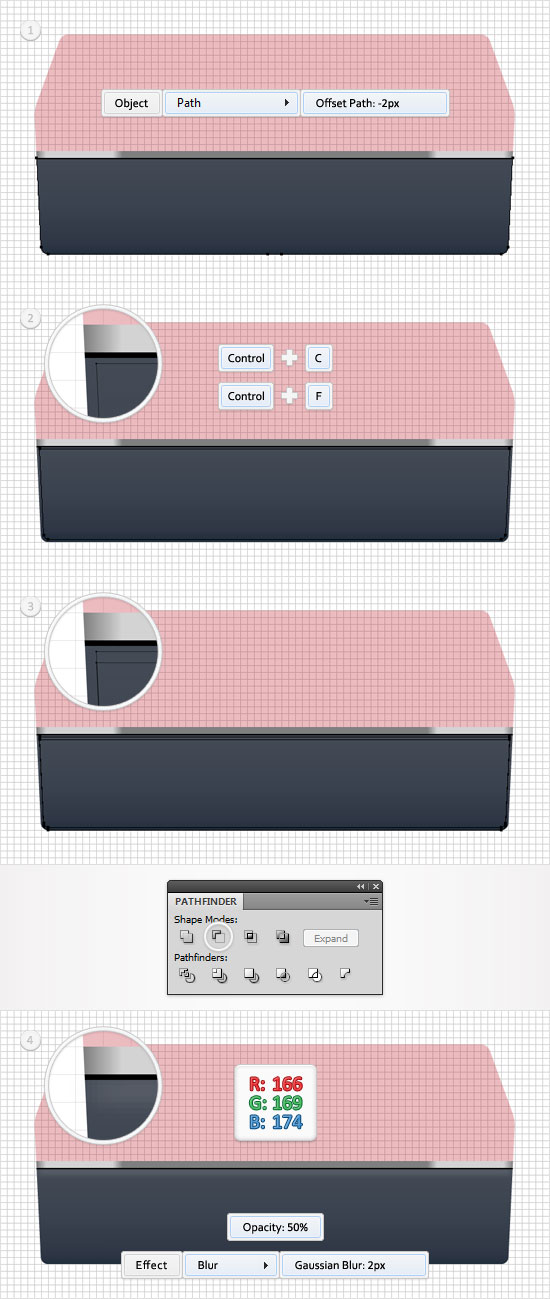
Step 8
Once again, select the shape edited in the finale of the fifth step and make two copies in front (Control + C > Control + F > Control + F). Select the top copy and move it 3px up. Reselect both copies and click on the Minus Front button from the Pathfinder panel. Fill the resulting shape with R=23 G=37 B=52.
Step 9
Move to the top shape created in the fifth step. Select it and fill it with the linear gradient shown in the following image.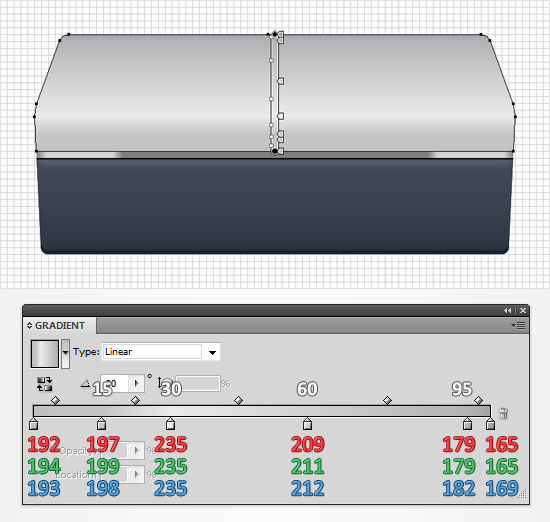
Step 10
Reselect the shape edited in the previous step and make two copies in front (Control + C > Control + F > Control + F). Select the top copy and move it 1px down and to the right. Reselect both copies and click on the Minus Front button from the Pathfinder panel. Fill the resulting shape with a random color, for now.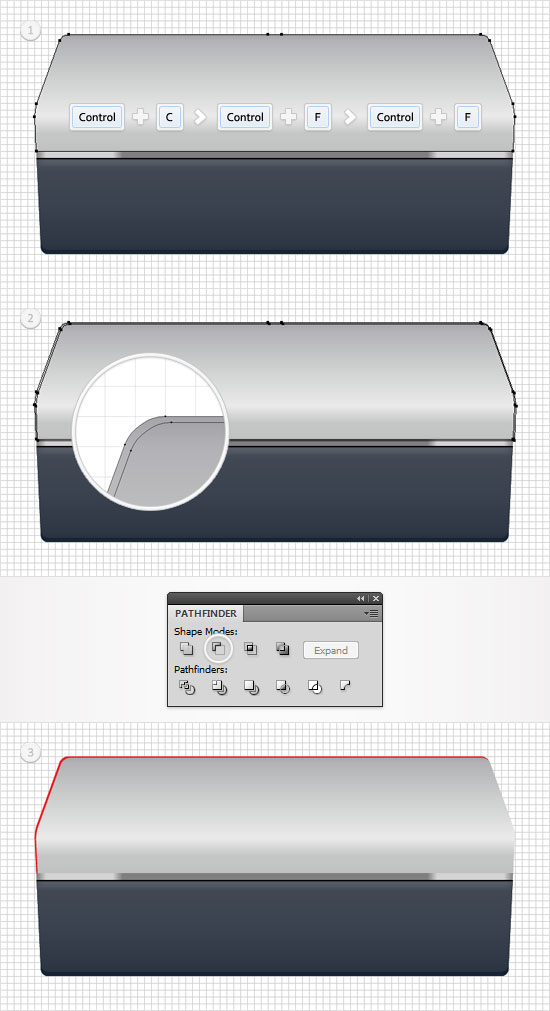
Step 11
Reselect the shape edited in the ninth step and make two new copies in front (Control + C > Control + F > Control + F). Select the top copy and move it 1px down and to the left. Reselect both copies and click on the Minus Front button from the Pathfinder panel. Again, fill the resulting shape with a random color.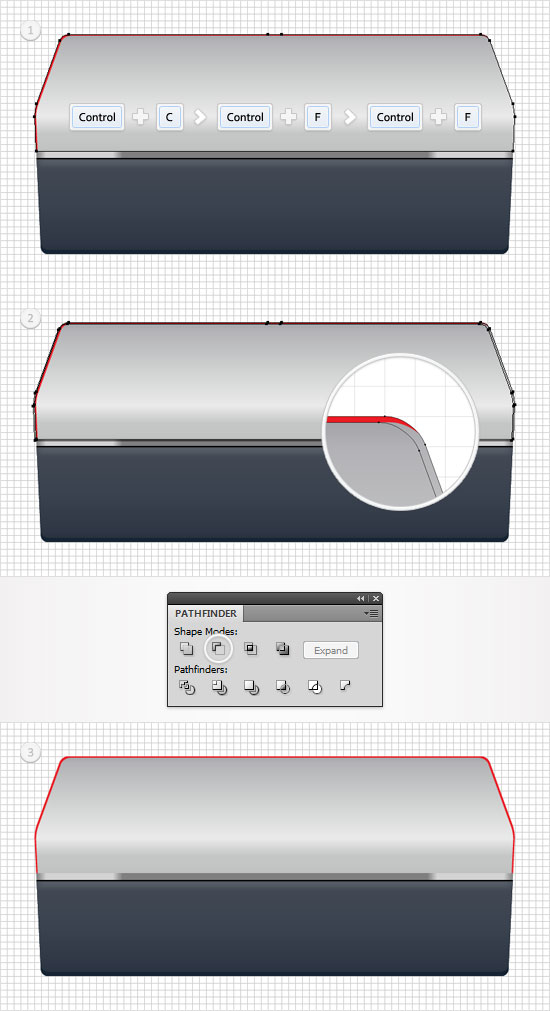
Step 12
Reselect the two shapes created in the last two steps and click on the Unite button from the Pathfinder panel. Fill the resulting shape with the linear gradient shown in the following image.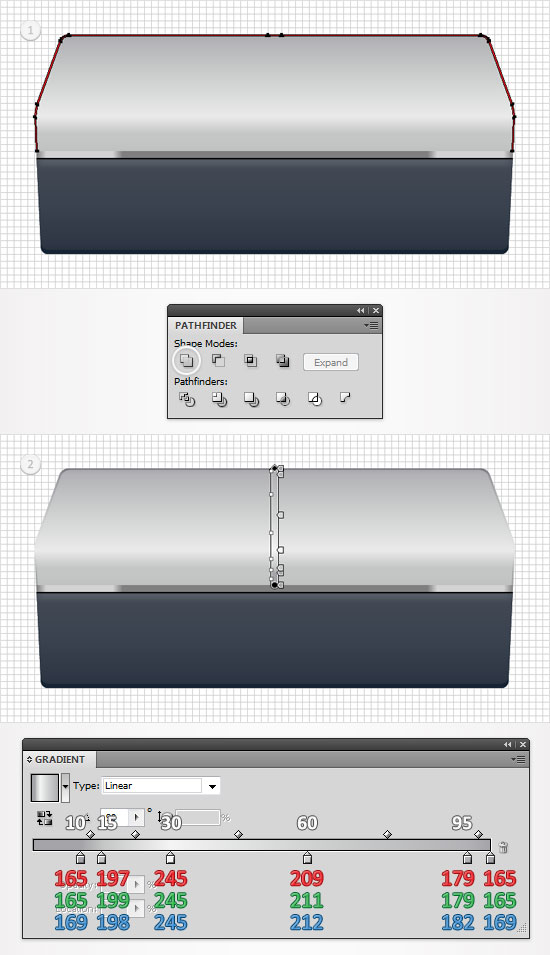
Step 13
Reselect the shape edited in the ninth step and make two copies in front (Control + C > Control + F > Control + F). Select the top copy and move it 1px up. Reselect both copies and click on the Minus Front button from the Pathfinder panel. Fill the resulting shape with R=244 G=244 B=244.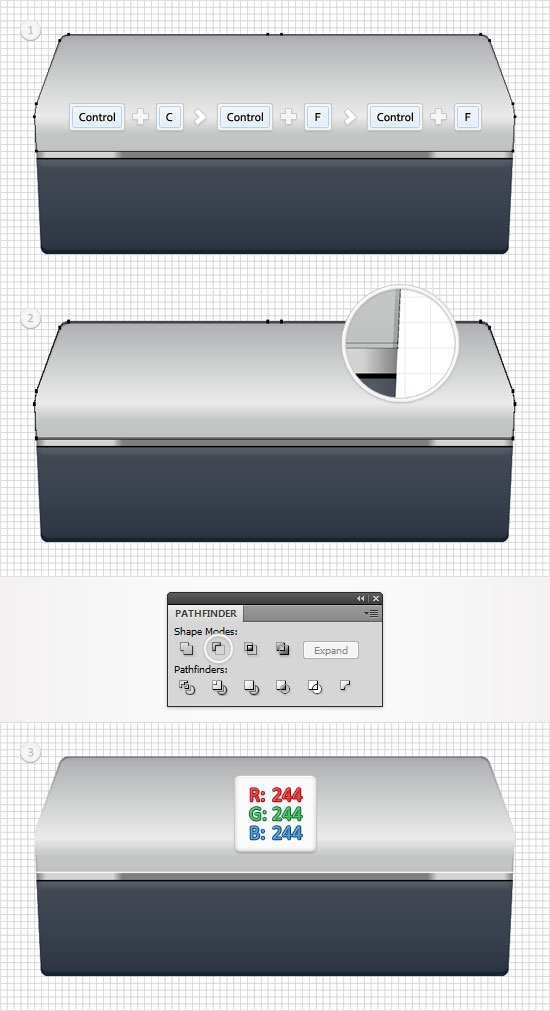
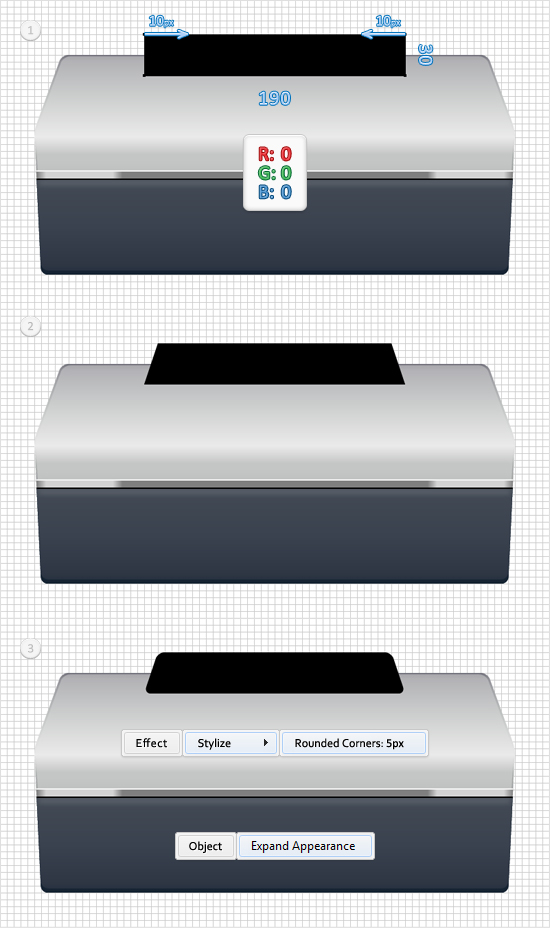
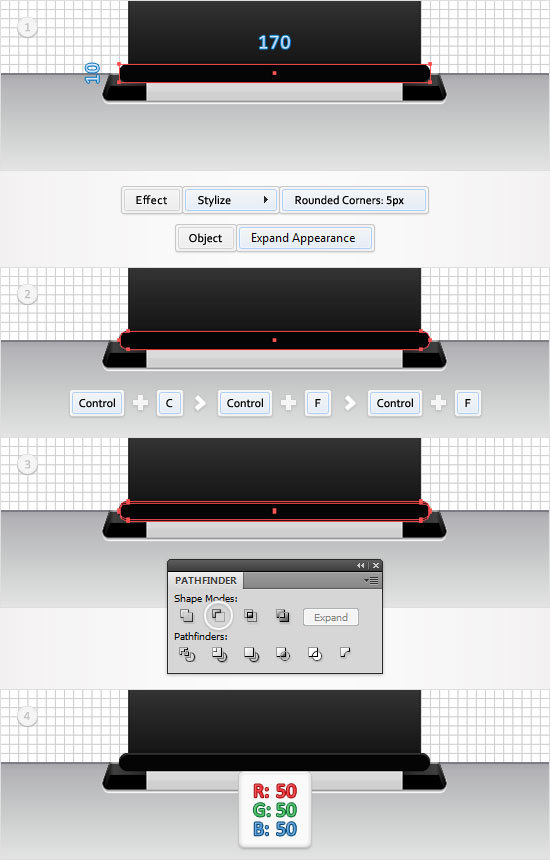
Step 14
Enable the Snap to Grid (View > Snap to Grid). Pick the Rectangle Tool(M), create a 190 by 30px shape, fill it with black and place it as shown in the first image. Switch to the Direct Selection Tool(A) and focus on this new shape. Select the top, left anchor point and move it 10px to the right then select the top, right anchor point and move it 10px to the left.In the end your shape should look like a trapezoid (image #2). Select it and go to Effect > Stylize > Rounded Corners. Enter a 5px radius, click OK and go to Object > Expand Appearance.
Step 15
Reselect the shape edited in the ninth step and make a copy in front (Control + C > Control + F). Select it along with the shape created in the previous step and click on the Intersect button from the Pathfinder panel.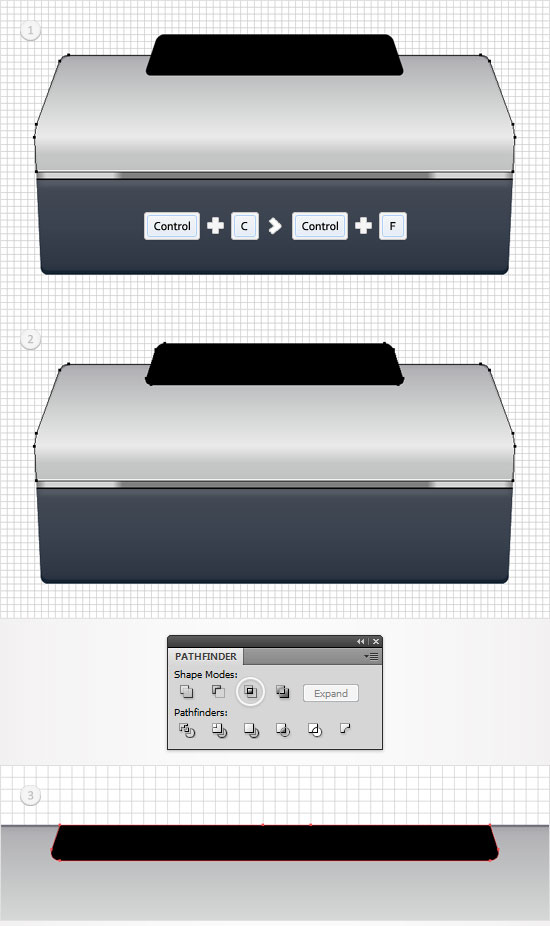
Step 16
Disable the Snap to Grid (View > Snap to Grid). Reselect the shape created in the previous step and make two copies in front (Control + C > Control + F > Control + F). Select the top copy and move it 1px down. Reselect both copies and click on the Minus Front button from the Pathfinder panel. Fill the resulting shape with the linear gradient shown in the final image.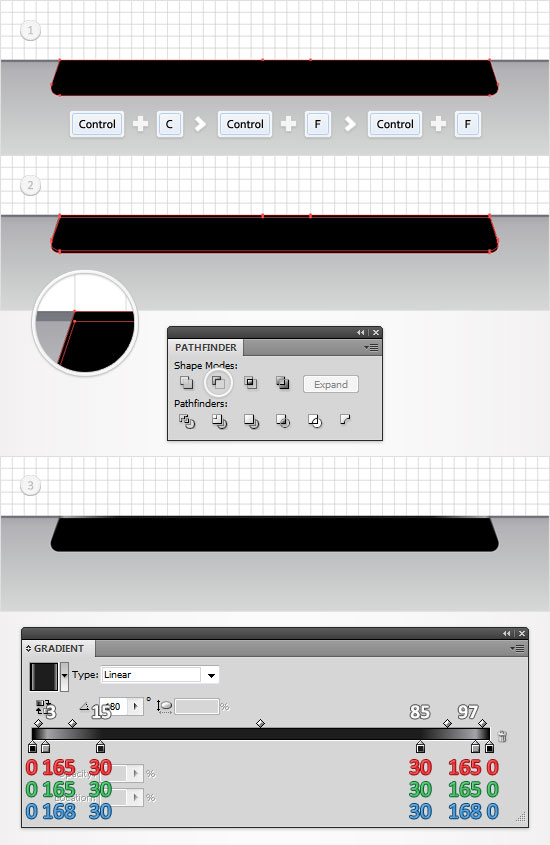
Step 17
Reselect the shape created in the fifteenth step and make two new copies in front (Control + C > Control + F > Control + F). Select the top copy and move it 7px down. Reselect both copies and click on the Minus Front button from the Pathfinder panel. Fill the resulting shape with the linear gradient shown in the final image.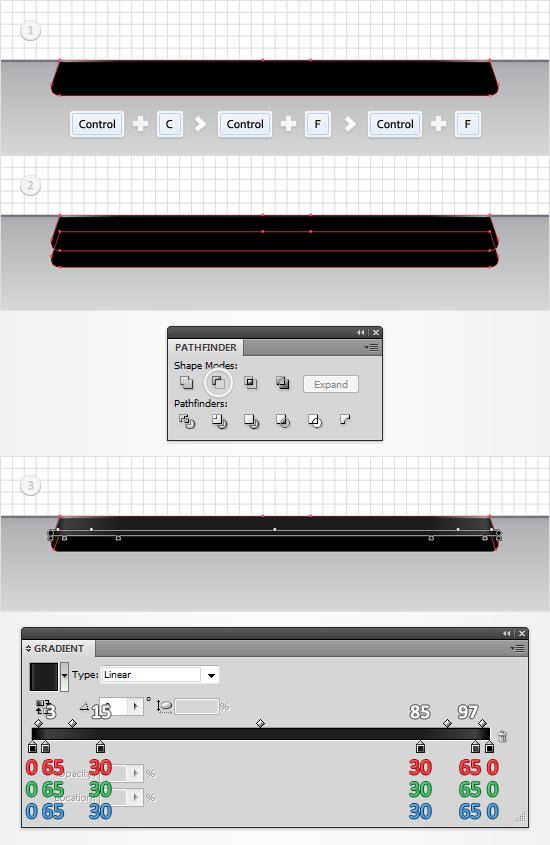
Step 18
Reselect the shape created in the fifteenth step and go to Effect > Stylize > Drop Shadow. Enter the properties shown in the left window, click OK and go again to Effect > Stylize > Drop Shadow. Enter the properties shown in the right window and click OK.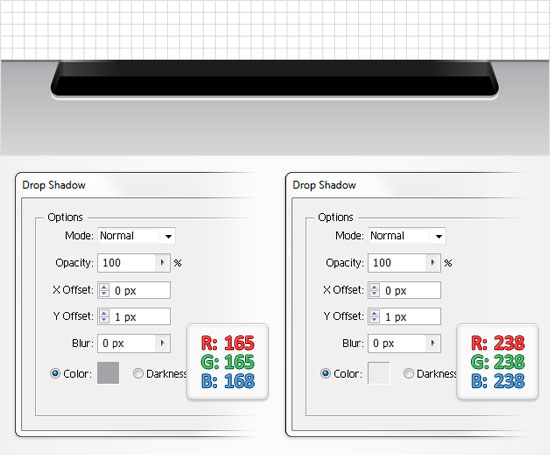
Step 19
Enable the Snap to Grid (View > Snap to Grid). Pick the Rectangle Tool(M), create a 140 by 150px shape, fill it with the linear gradient shown below and place it as shown in the following image.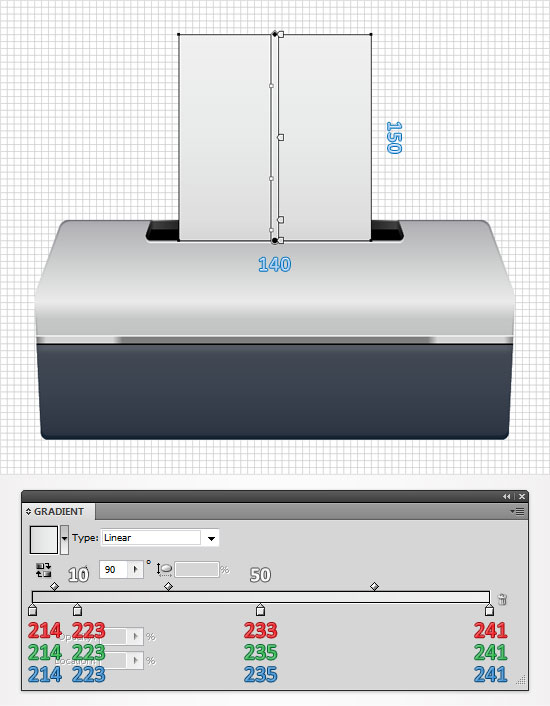
Step 20
Disable the Snap to Grid (View > Snap to Grid). Reselect the shape created in the previous step and go to Object > Path > Offset Path. Enter a -1px Offset and click OK. Duplicate the resulting shape (Control + C > Control + F). Select this copy and move it 1px down. Reselect both shape created in this step and click on the Minus Front button from the Pathfinder panel. Fill the resulting shape with R=250 G=250 B=250.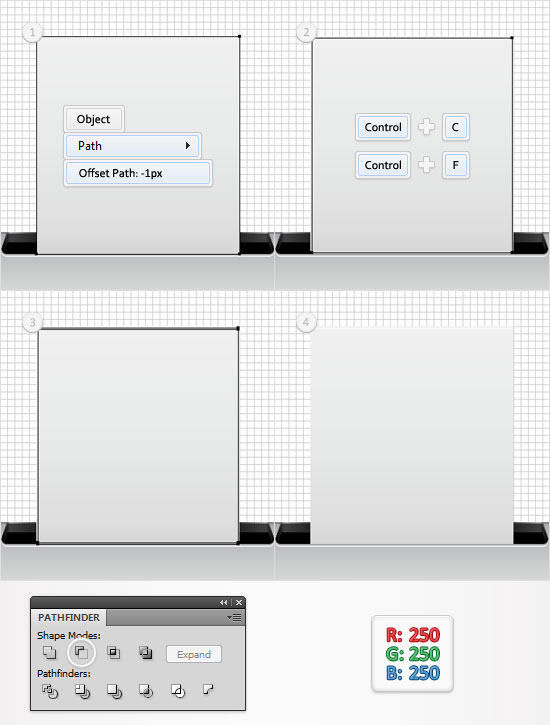
Step 21
Reselect the shape created in the nineteenth step and make two copies in front (Control + C > Control + F > Control + F). Select the top copy and move it 5px up. Reselect both copies and click on the Minus Front button from the Pathfinder panel. Fill the resulting shape with black and lower its opacity to 3%.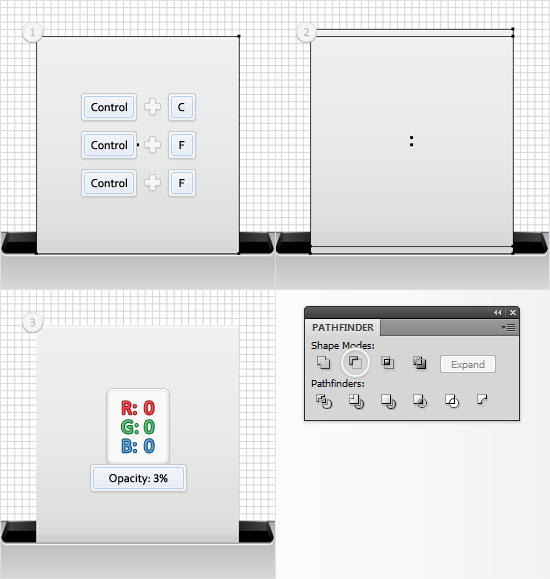
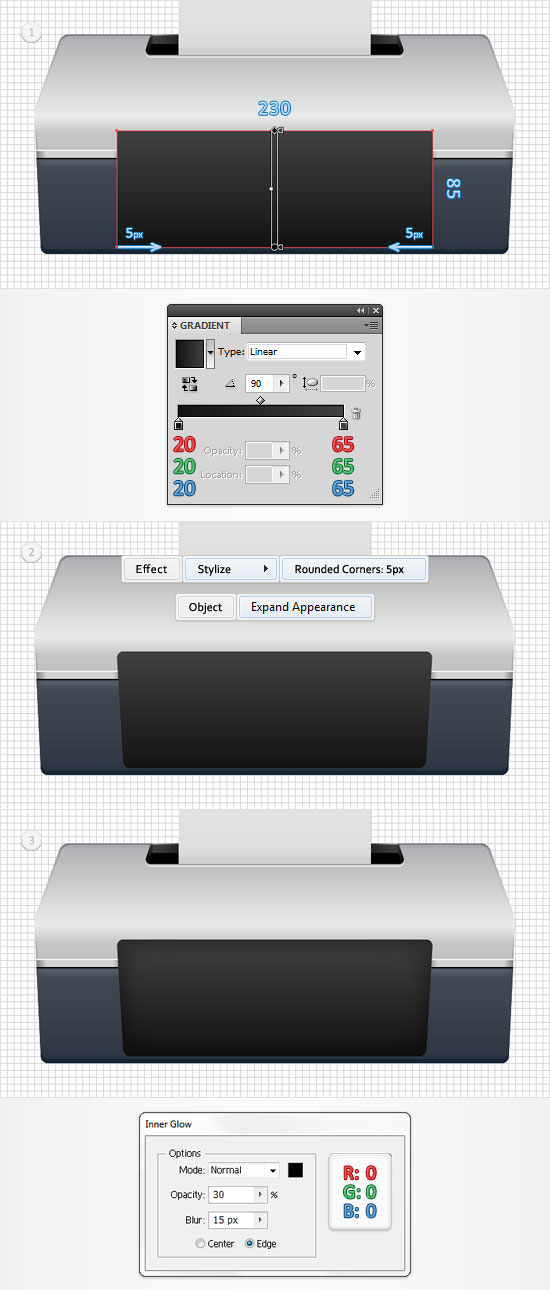
Step 22
Enable the Snap to Grid (View > Snap to Grid). Pick the Rectangle Tool(M), create a 230 by 85px shape, fill it with the linear gradient shown below and place it as shown in the first image. Switch to the Direct Selection Tool(A), select the bottom, left anchor point and move it 5px to the right then select the bottom, right anchor point and move it 5px to the left.Make sure that this new shape is selected and go to Effect > Stylize > Rounded Corners. Enter a 5px radius, click OK and go to Object > Expand Appearance. Finally, select the resulting shape and go to Effect > Stylize > Inner Glow. Enter the data shown in the final image and click OK.
Step 23
Pick the Rectangle Tool(M), create a 170 by 45px shape, fill it with the linear gradient shown below and place it as shown in the following image. Select it and go to Effect > Stylize > Inner Glow. Enter the properties shown below, click OK and go to Effect Stylize > Drop Shadow. Again, enter the data shown in the following image and click OK.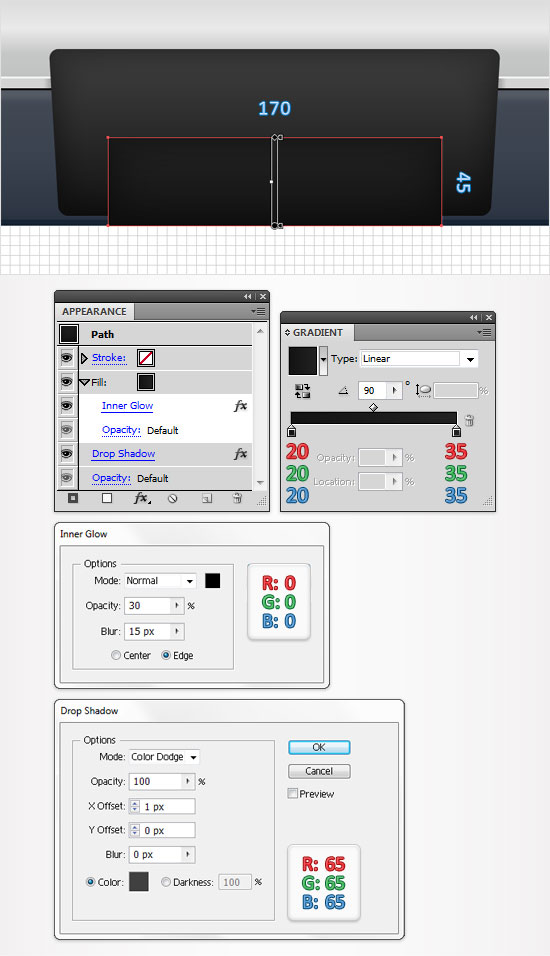
Step 24
Pick the Rectangle Tool(M), create a new 170 by 45px shape, fill it with the linear gradient shown below and place it as shown in the following image. Select it and go to Effect > Stylize > Inner Glow. Enter the properties shown below, click OK and go to Effect Stylize > Drop Shadow. Again, enter the data shown in the following image and click OK.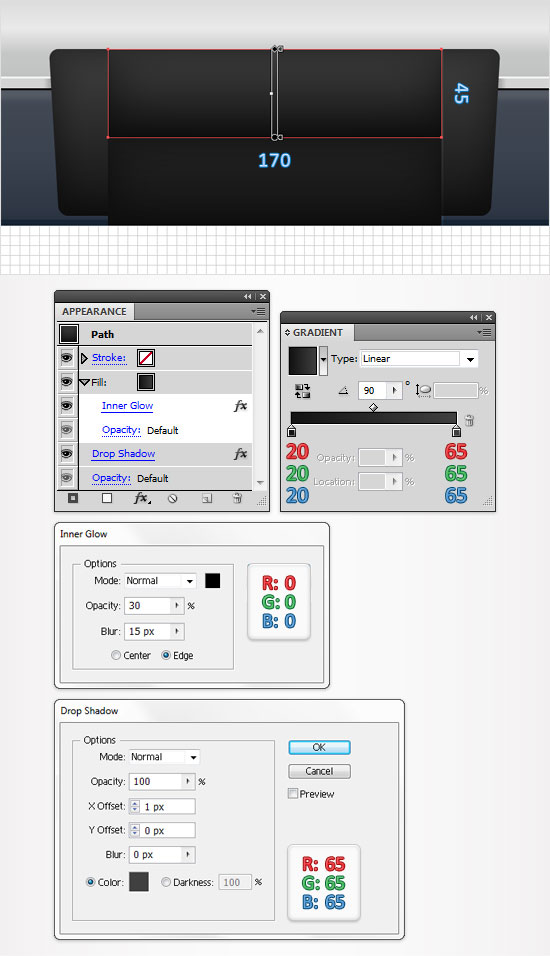
Step 25
Disable the Snap to Grid (View > Snap to Grid). Reselect the shape created in the previous step and make two copies in front (Control + C > Control + F > Control + F). Select the top copy and move it 1px up. Reselect both copies and click on the Minus Front button from the Pathfinder panel. Select the resulting shape and focus on the Appearance panel. Remove the Inner Glow and the Drop Shadow effect then replace the linear gradient used for the fill with R=36 G=36 B=36.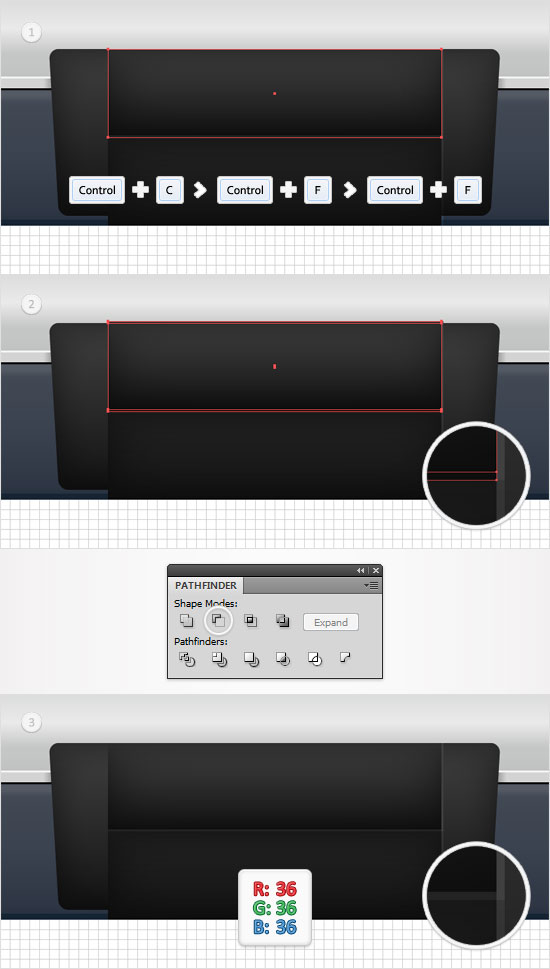
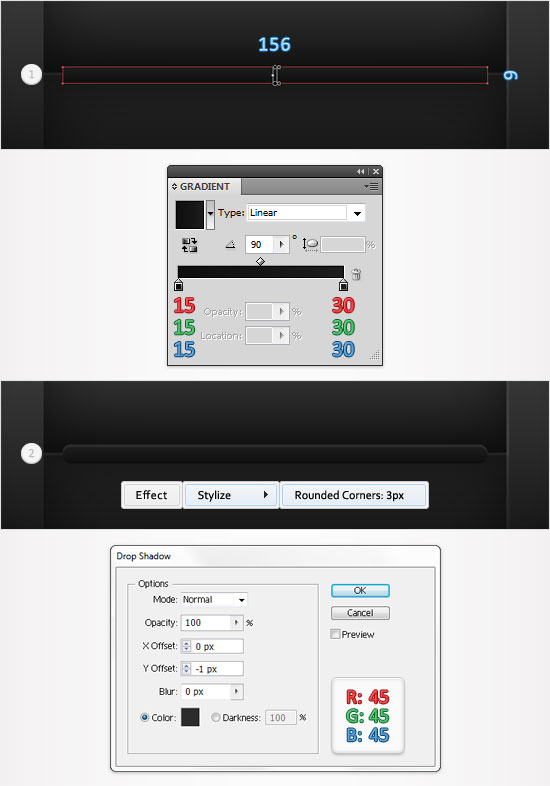
Step 26
Enable the Snap to Grid (View > Snap to Grid). For the following step you will need a grid every 1px. So, go to Edit > Preferences > Guides & Grid and enter 1 in the Gridline every box. Pick the Rectangle Tool(M), create a 156 by 6px shape, fill it with the linear gradient shown below and place it as shown in the following image. Select it and go to Effect > Stylize > Rounded Corners.Enter a 3px radius, click OK and go to Object > Expand Appearance. Make sure that the resulting shape is selected and go to Effect > Stylize > Drop Shadow. Enter the properties shown in the final image and click OK.
Step 27
Return to "gridline every 5px". So, go to Edit > Preferences > Guides & Grid and enter 5 in the Gridline every box. Pick the Rectangle Tool(M), create a 220 by 40px shape, fill it with a random color and place it as shown in the first image. Switch to the Direct Selection Tool(A), select the bottom, left anchor point and move it 10px to the left then select the bottom, right anchor point and move it 10px to the right.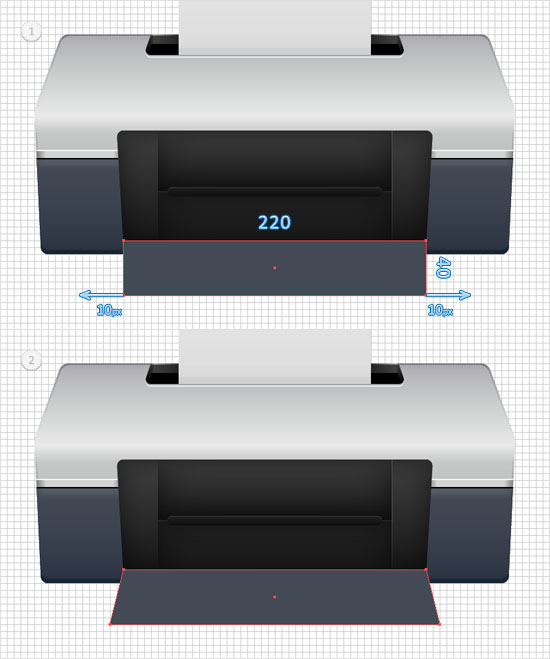
Step 28
Pick the Rectangle Tool(M), create two, 5 by 10px shape and place them as shown in the following image. Fill them with a random color then go to Effect > Stylize > Rounded Corners. Enter a 3px radius, click OK and go to Object > Expand Appearance. Select the resulting shapes along with the shape created in the previous step and click on the Unite button from the Pathfinder panel. Fill the resulting shape with the linear gradient shown in the final image.
Step 29
Disable the Snap to Grid (View > Snap to Grid). Reselect the shape created in the previous step and make two copies in front (Control + C > Control + F > Control + F). Select the top copy and move it 1px down. Reselect both copies and click on the Minus Front button from the Pathfinder panel. Move to the Layers panel, select the resulting group of shapes, turn it into a compound path (Object > Compound Path > Make) and fill it with R=23 G=34 B=50.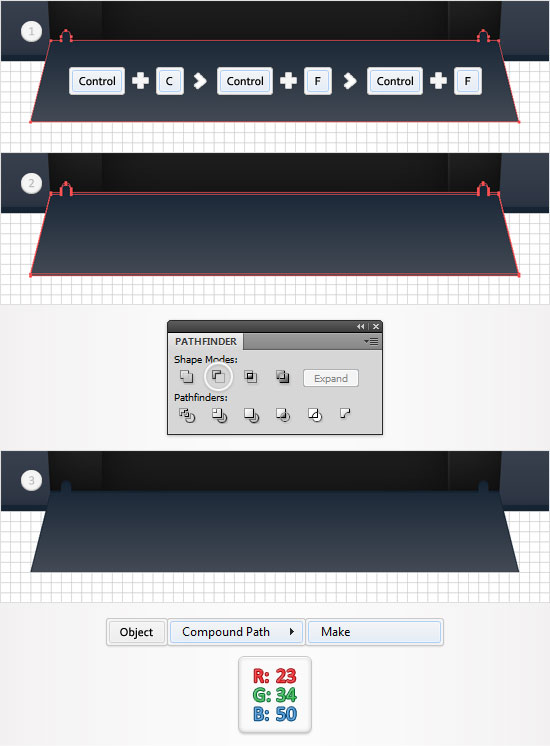
Step 30
Reselect the shape created in step #28 and make two copies in front (Control + C > Control + F > Control + F). Select the top copy and move it 2px down. Reselect both copies and click on the Minus Front button from the Pathfinder panel. Again, turn the resulting group of shapes into a compound path (Object > Compound Path > Make) and fill it with R=47 G=55 B=69.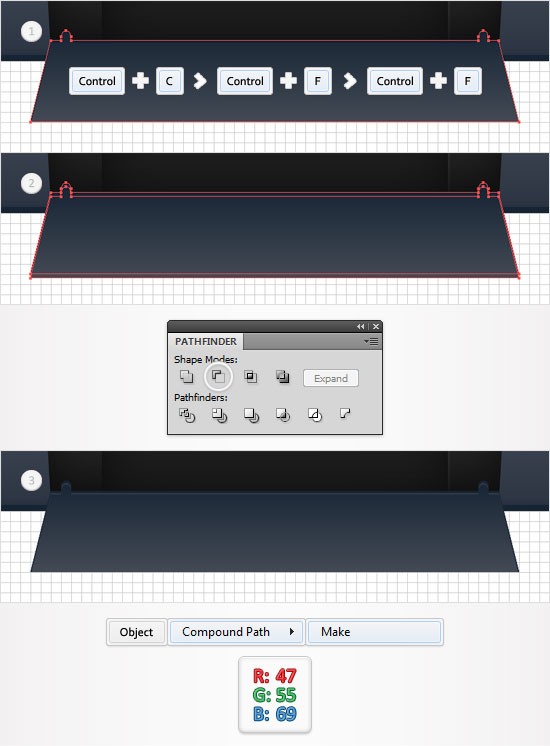
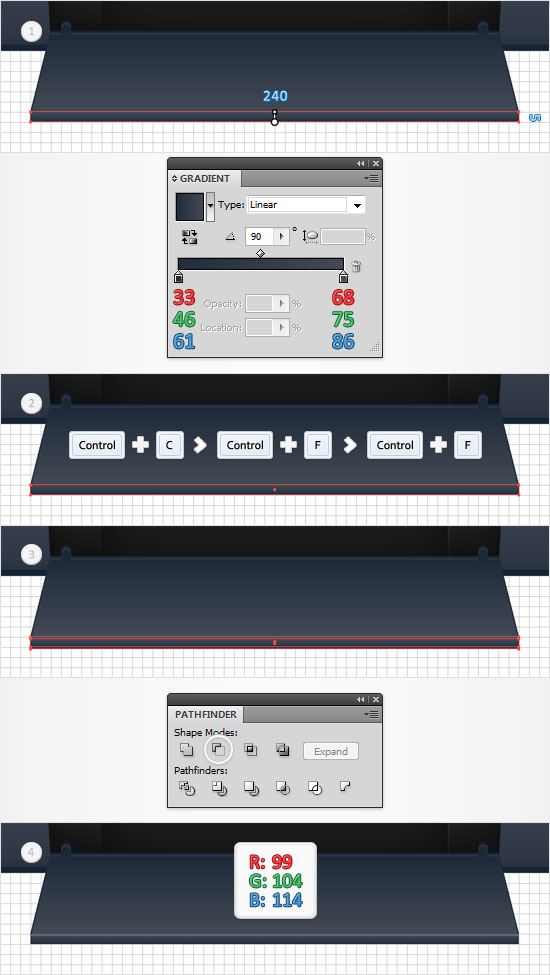
Step 31
Enable the Snap to Grid (View > Snap to Grid). Pick the Rectangle Tool(M), create a 240 by 5px shape, fill it with the linear gradient shown below and place it as shown in the following image. Select it and make two copies in front (Control + C > Control + F > Control + F).Disable the Snap to Grid (View > Snap to Grid), select the top copy and move it 1px down. Reselect both copies and click on the Minus Front button from the Pathfinder panel. Fill the resulting shape with R=99 G=104 B=114.
Step 32
Enable the Snap to Grid (View > Snap to Grid). Pick the Rectangle Tool(M), create a 180 by 70px shape, fill it with a random color and place it as shown in the first image. Switch to the Direct Selection Tool(A), select the top, left anchor point and move it 15px to the right then select the top, right anchor point and move it 15px to the left. Download this image (or any image) and drag it inside your AI file. Resize it a little and place it as shown in the final image.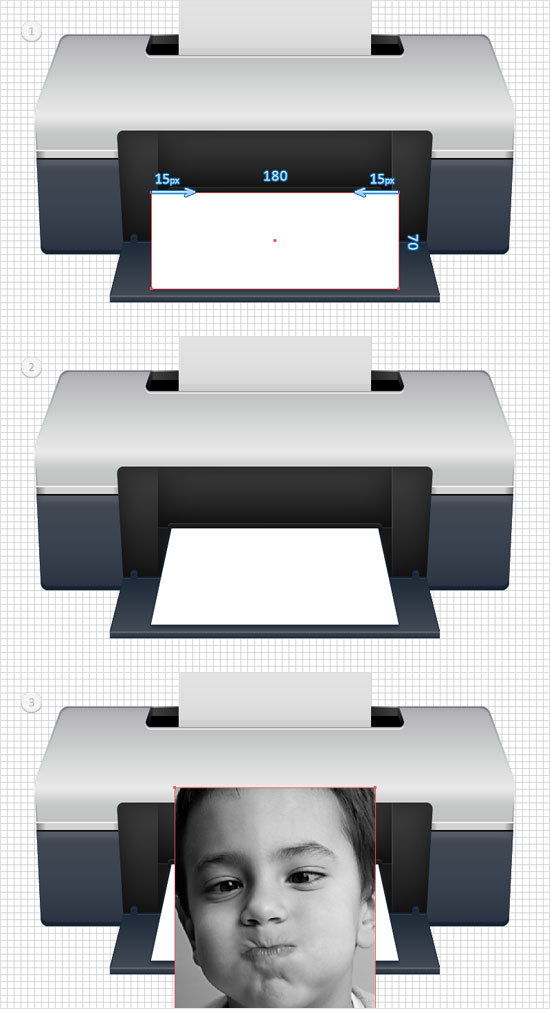
Step 33
Reselect the trapezoid shape created in the previous step, make a copy in front (Control + C > Control + F) and bring it to front (Shift + Control + ] ). Select this copy along with the image added in the previous step and go to Object > Envelope Distort > Make with Top Object. In the end your image should look like it does in the third image.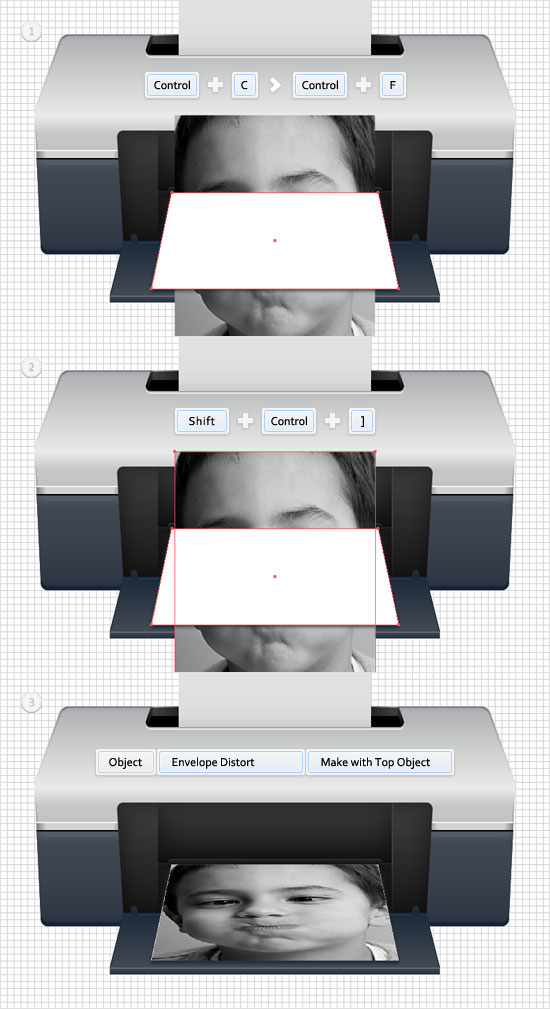
Step 34
Reselect the trapezoid shape created in step #32 and bring it to the front (Shift + Control + ] ). Replace the flat color used for the fill with the linear gradient shown below. The yellow zero from the gradient image stands for opacity percentage. Make sure that this shape is still selected and focus on the Appearance panel. First, select the fill and lower its opacity to 50%. Next, add a 0.5pt stroke, set its color at R=30 G=30 B=30 and align it to the inside.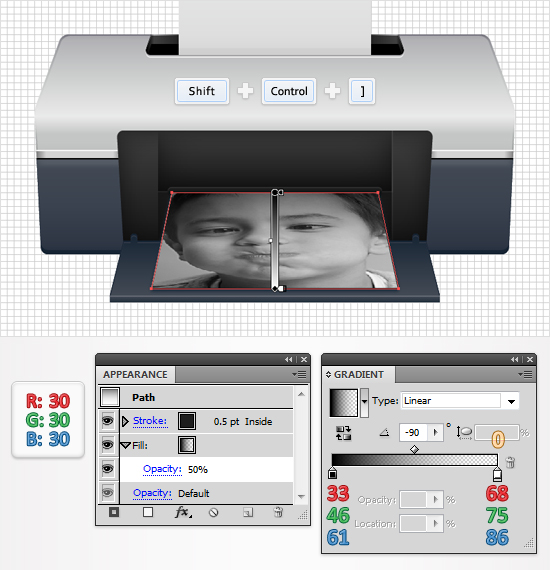
Step 35
Again, you will need a grid every 1px. So, go to Edit > Preferences > Guides & Grid and enter 1 in the Gridline every box. Pick the Rectangle Tool(M), create a 1 by 5px and a 15 by 5px rectangle, fill them with the linear gradients shown below and place them as shown in the following image.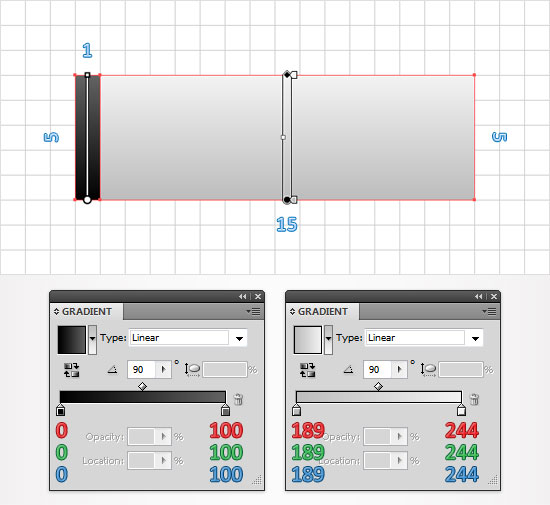
Step 36
Select the larger rectangle created in the previous step and make two copies in front (Control + C > Control + F > Control + F). Select the top copy and move it 1px up. Reselect both copies and click on the Minus Front button from the Pathfinder panel. Fill the resulting shape with the linear gradient shown below.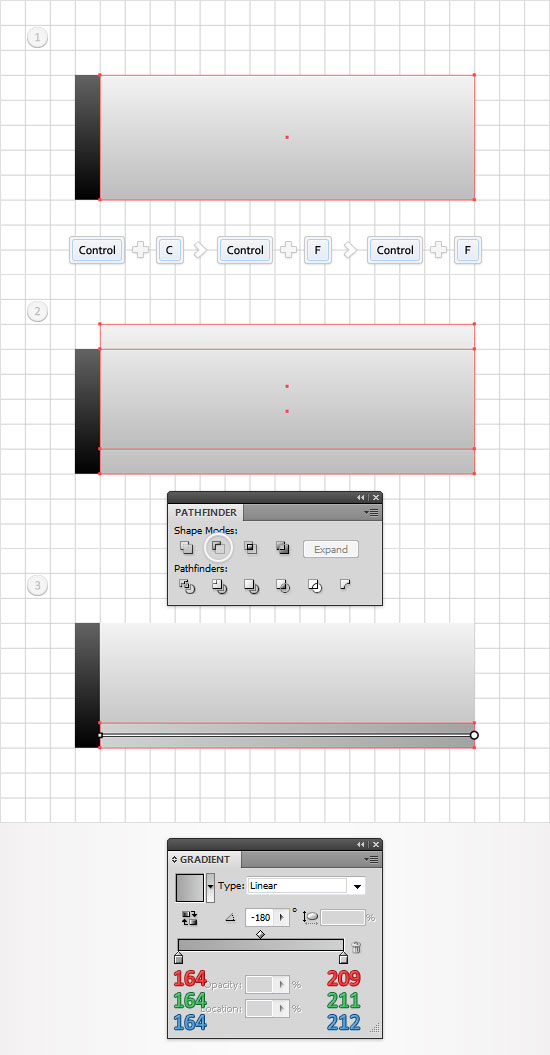
Step 37
Reselect the larger rectangle created in step #35 and make two new copies in front (Control + C > Control + F > Control + F). Select the top copy and move it 1px down and to the left. Reselect both copies and click on the Minus Front button from the Pathfinder panel. Fill the resulting shape with white.
Step 38
Multiply the shapes created in the last three steps and place the copies in a row, as shown in the first image. Select all these copies along with the original shapes and place them as shown in the second image. The Snap to Grid should ease your work.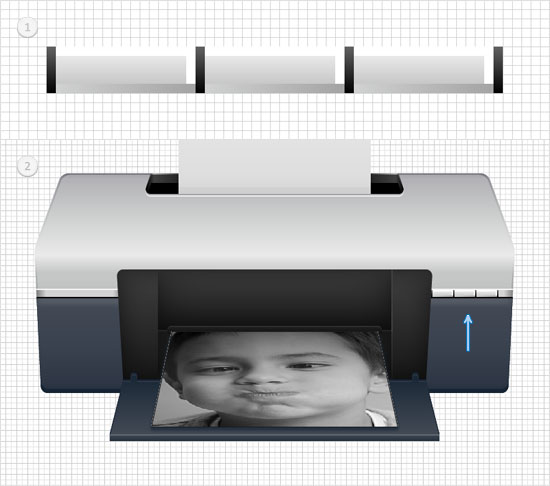
Step 39
Return to "gridline every 5px". Pick the Rectangle Tool(M) and create a 150 by 45px shape. Fill it with the linear gradient shown below, place it as shown in the following image and go to Effect > Stylize > Rounded Corners. Enter a 5px radius, click OK and go to Object > Expand Appearance.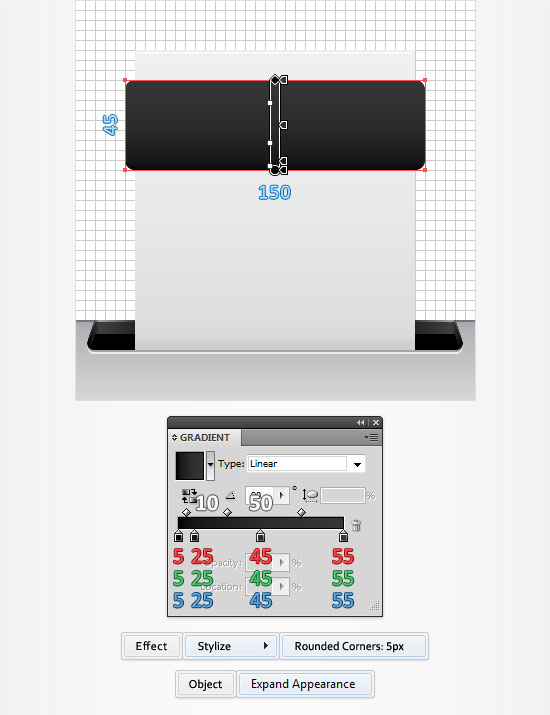
Step 40
Disable the Snap to Grid (View > Snap to Grid). Reselect the shape created in the previous step and go to Object > Path > Offset Path. Enter a -1px Offset and click OK. Duplicate the resulting shape (Control + C > Control + F). Select this copy and move it 1px down. Reselect both shapes created in this step and click on the Minus Front button from the Pathfinder panel. Fill the resulting shape with R=150 G=150 B=150.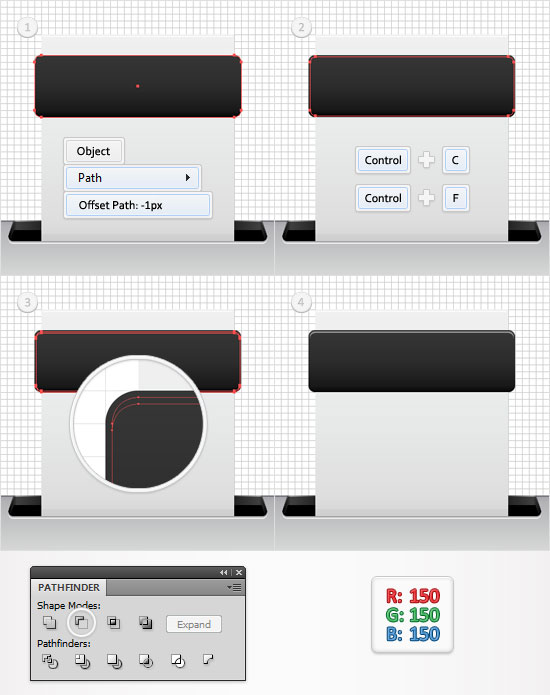
Step 41
Reselect the rounded rectangle created in step #39, focus on the Appearance panel and add a second fill using the Add New Fill. It’s the little, white square icon from the bottom of the Appearance panel. Select this new fill, lower its opacity to 20%, add the linear gradient shown below and go to Effect > Path > Offset Path. Enter a -1px Offset and click OK.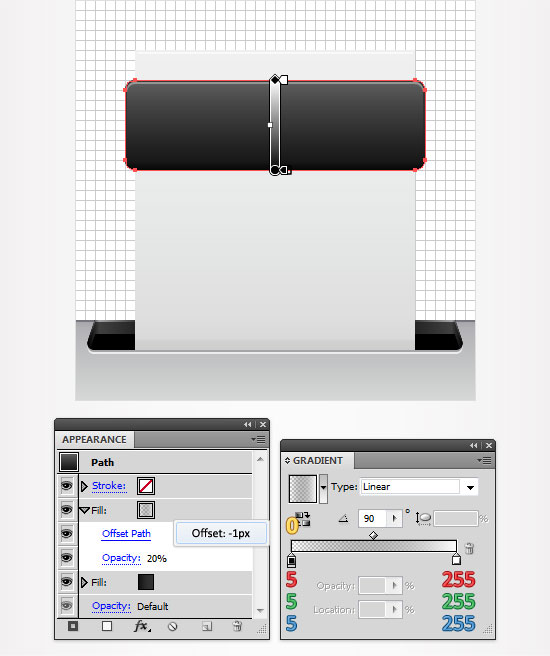
Step 42
Enable the Snap to Grid (View > Snap to Grid). Pick the Rectangle Tool(M) and create a 160 by 80px shape. Fill it with the linear gradient shown below, place it as shown in the following image and go to Effect > Stylize > Rounded Corners. Enter a 5px radius, click OK and go to Object > Expand Appearance.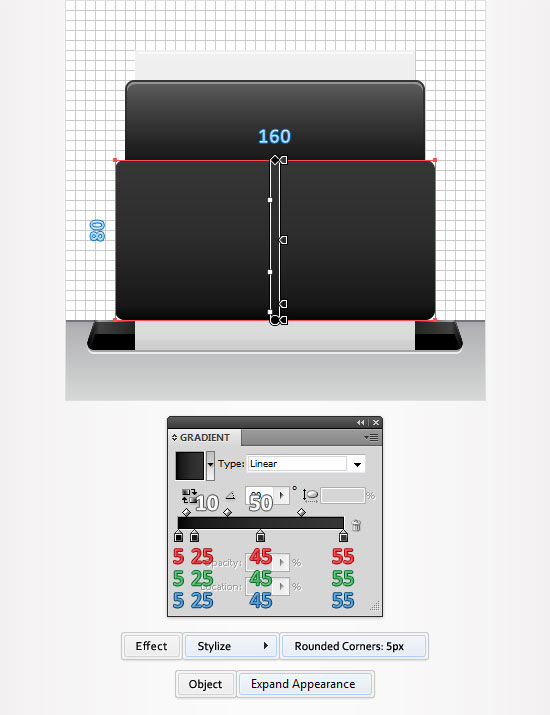
Step 43
Disable the Snap to Grid (View > Snap to Grid). Reselect the shape created in the previous step and go to Object > Path > Offset Path. Enter a -1px Offset and click OK. Duplicate the resulting shape (Control + C > Control + F). Select this copy and move it 1px down. Reselect both shapes created in this step and click on the Minus Front button from the Pathfinder panel. Fill the resulting shape with R=150 G=150 B=150.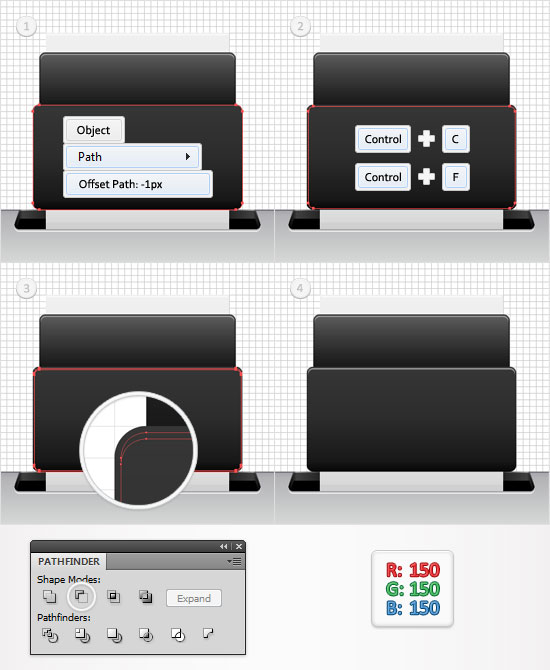
Step 44
Reselect the rounded rectangle created in step #42 and add a second fill. Select it from the Appearance panel, lower its opacity to 20%, add the linear gradient shown below and go to Effect > Path > Offset Path. Enter a -1px Offset and click OK.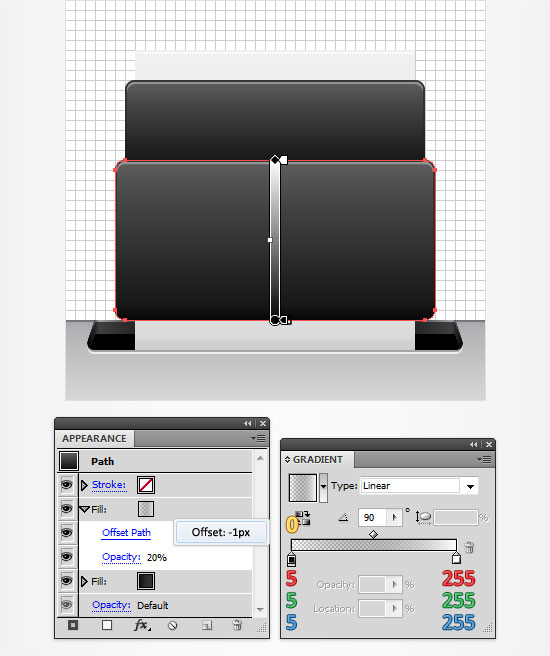
Step 45
Enable the Snap to Grid (View > Snap to Grid). Pick the Rectangle Tool(M) and create a 170 by 10px shape. Fill it with R=5 G=5 B=5, place it as shown in the following image and go to Effect > Stylize > Rounded Corners. Enter a 5px radius, click OK and go to Object > Expand Appearance.Disable the Snap to Grid (View > Snap to Grid). Select this new rounded rectangle and make two copies in front (Control + C > Control + F > Control + F) Select the top copy and move it 1px down. Reselect both copies and click on the Minus Front button from the Pathfinder panel. Fill the resulting shape with R=50 G=50 B=50.
Step 46
One last time, you will need a grid every 1px. So, go to Edit > Preferences > Guides & Grid and enter 1 in the Gridline every box. Pick the Rectangle Tool(M), create two, 1 by 10px shapes and place them side by side as shown in the first image. Fill the left rectangle with R=50 G=50 B=50 and the right one with the linear gradient shown in the following image. Duplicate these two rectangles and drag the copies to the right as shown in the second image.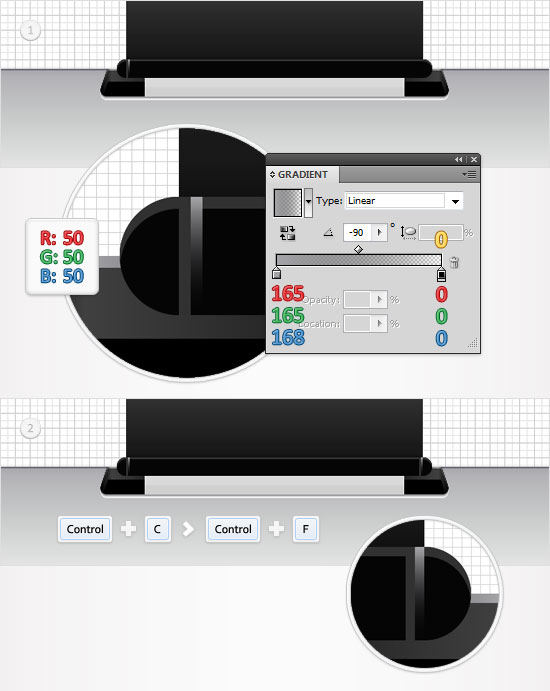
Step 47
Finally, select all the shapes created in the last eight steps, group them (Control + G) and send the group to the back (Shift + Control + [ ).
And We’re Done!
That wraps up this end of the Adobe Illustrator tutorial. We hope that you learned a few new tricks and steps a long the way. Once again, here is what your final image should look like.


Comments
Post a Comment